Well, we had hoped to have the birds moved in by the end of the day today, but we didn't quite make it. We worked hard all weekend, and at 6:30pm, we were too tired and hungry to keep going, but soooooooooooo close! All we really have left to do is to finish the chicken wire around the run enclosure, paint the trim, and finish the roofing. I'm really happy with the way it's turning out. Here are our photo's at the end of the day today:
This is just an overall photo showing the new coop (on the right), the new run and our old Japanes Bantam's coop also known as Charlie's coop on the left.
The two photo's above show the outdoor run areas. In case you missed the previous post, this long coop will be divided in half inside, so it is acutally two coops in one. Each side is a mirror image of the other. The run is also split in half although one side is a bit bigger. We plan to add our new laying hens to the side with the larger run and our new bantams to the other side. In the future we may use them as seperate breeding pens.
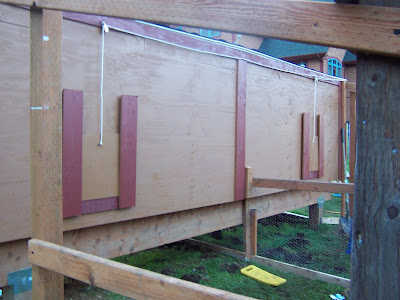
Here you can see the two pop doors which lead out to the run area's. My lovely husband has fashioned a most excellent pulley system which allows you to pull a rope outside the run and have both doors open simultaneously. It is really cool and the kids most favorite feature. We had planned to maybe build some ramps up to the pop doors, but our older birds who have been hanging around during the entire construction process, have proven to us that they really aren't necessary. Almost all the birds have managed to hop up through the pop door at some given time during construction. We will see how the new young birds do, and may still add some ramps in if needed.
This last photo shows all the other access doors to one end of the coop except for the pop door into the run. Each end of the coop has three nesting boxes and each nest has a sliding egg door to retrieve the eggs. Below the nesting boxes inside, will be the feeder and waterer, and there is a fold down door to easily access these. On the right side you can see the "man door" with a window. This will be used primarily for mucking out the coop, with a wheel barrow parked beneath it. However, if we do need to go inside this is where we can get in. The plexi-glass window also slides up and can be removed, and will have hardware cloth behind, if needed on hot summer days/evenings for more ventilation. I don't know if you can tell, but along this side of the coop above the man doors will also be a gutter system that will eventually lead to a rain barrel. I'm really excited about that!
And that is where we are today. I will be working my butt off tomorrow to get the run done. That's really the last "must-do" item before the birds move in.
Speaking of birds, I have to show off the new residents as well! Here are the new laying hens, 12 of those plus one white cochin frizzle bantam who was our mystery chick. She will move in with the other banties when they are old enough to move in. These guys are almost 11 weeks old and more than ready for their new home!
And here are the baby bantams, only 5 of these and I think they are 3 or 4 weeks old now? Two are Old English, one Self Blue, not sure on the other. The other 3 all came from an assorment of frizzle bantams, although only one looks to be showing the actual frizzle feathers. I think they are all Frizzle Cochin Bantams, and I'm anxious to see what color they will turn out to be. Also curious to see if we wind up with any roosters in this batch as they were all straight run.
Thanks for checking in! I'll be posting more photo's when these guys are all moved in. :-)
Sunday, April 19, 2009
Monday, April 6, 2009
Building the Pallet Coop has begun!
Well construction is finally underway! We've been blessed with some gorgeous weather finally, and we have been busy. We started this weekend on our new coop. It is being constructed using recycled pallets primarily. It's actually 2 coops in one as it is very long and will be divided in two, one end for our bantams and one end for our new laying hens. This is our third coop in all. Our original coop houses our older laying hens. We have a small coop which houses our Japanese Bantams currently, as they are my oldest DD's 4-H project. We currently have two batches of chicks that will be moving into the new coop as soon as it's ready, (13) 9 week old chicks, and (5) 2 week old bantams.
Here's the photo's so far. The first photo just shows the base of the coop. We built it raised, so the chickens can go underneath as part of their run, for protection from the sun and/or rain. To the left is the Japanese Bantams coop. Over this base we laid a plywood floor:
The next photo shows the side where the pop doors will be, the doors the chickens come out of to access their outdoor run area. You can see one of the pop doors framed out on the right, and some of the ladies in the foreground:
This is a close up of one end of the coop, showing my lovely DH hard at work! This also shows the three built in nesting boxes with space below to place the waterer and feeder. There will be doors on the end for egg retrieval and a larger door below for accessing the food and water. On the other side of the pop door beyond, will be the roosting area. The two coops in the one building will be built as mirror opposites of each other, so the same set up will also be at the far end for the bantams:
Last, this photo shows the back side of the coop, showing the "man" doors framed out. These doors are for access if we need to get in the coop, but primarily they will be used for mucking out the coop. We will park a wheel barrow below the open door and rake out the soiled bedding. You can also see the roof taking shape here as we begin to put the pallets up there:
And that's where we are today! I will post more photo's when we get the roof on and the wall sheathing and doors up. Hope you will check back soon!
Subscribe to:
Posts (Atom)